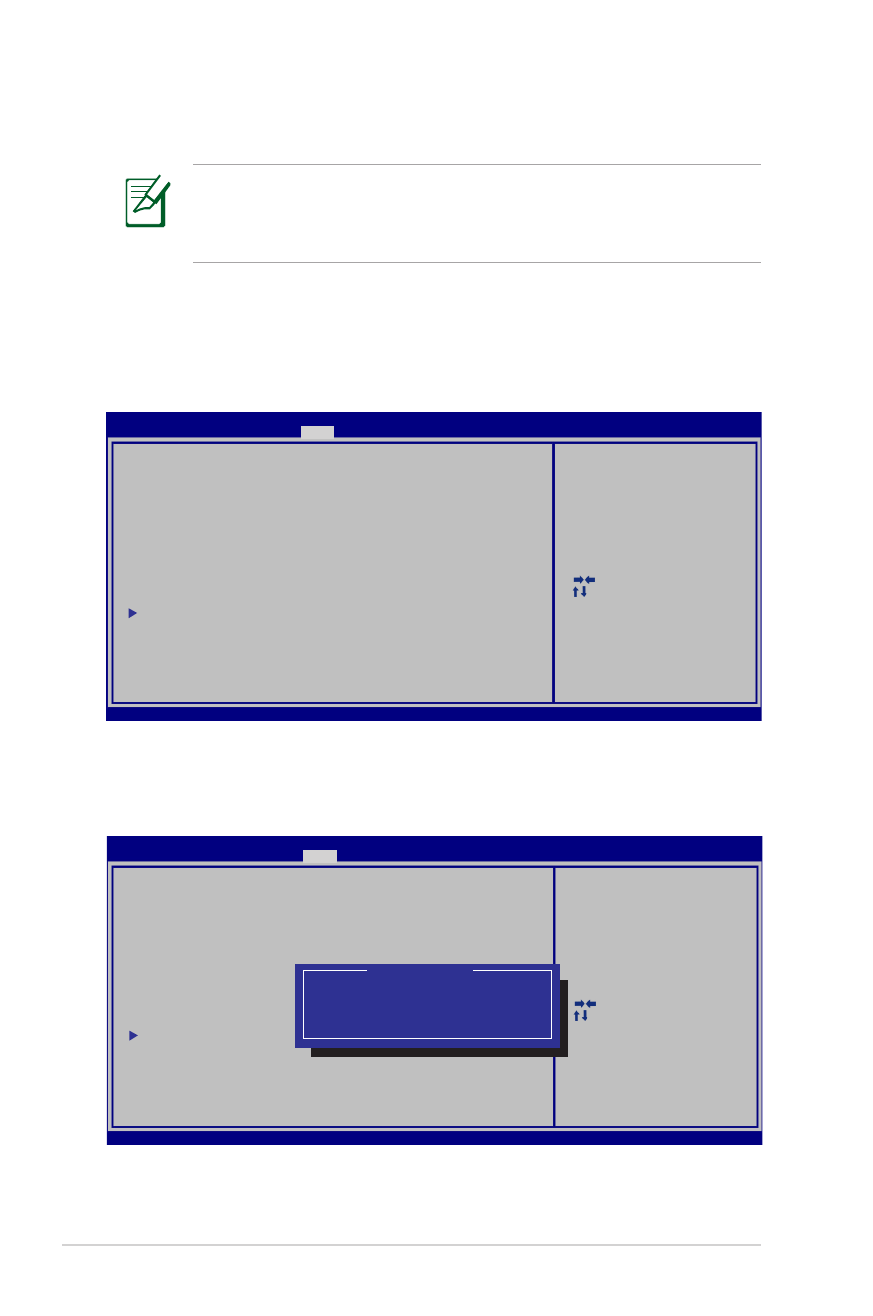
Setările bIOS ale sistemului
bootarea dispozitivului
1. În ecranul boot (Pornire sistem), selectaţi boot Option #1. (Pornire
sistem prima opţiune).
2. Apăsaţi pe [Enter] (Enter) şi selectaţi un dispozitiv, conform cu
boot Option #1 (Pornire sistem prima opţiune).
Poziţia efectivă a portului LAN diferă în funcţie de model.
Consultaţi capitolul precedent pentru a vedea unde se află
portul LAN.
: Select Screen
:
Select Item
Enter: Select
+/—: Change Opt.
F1: General Help
F9: Optimized Defaults
F10: Save ESC: Exit
Version 2.01.1208. Copyright (C) 2011 American Megatrends, Inc.
Aptio Setup Utility - Copyright (C) 2011 American Megatrends, Inc.
Main Advanced Chipset
Boot
Security Save & Exit
Boot Configuration
UEFI Boot
[Enabled]
Launch PXE OpROM
[Disabled]
Boot Option Priorities
Boot Option #1
[P0: WDC WD7500BPKT...]
Boot Option #2
[P2: MATSHITABD-MLT...]
Boot Option #3
[Windows Boot Manager]
CD/DVD ROM Drive BBS Priorities
Hard Device BBS Priorities
Add New Boot Option
Delete Boot Option
Enables/Disables UEFI boot from
disks.
: Select Screen
:
Select Item
Enter: Select
+/—: Change Opt.
F1: General Help
F9: Optimized Defaults
F10: Save ESC: Exit
Version 2.01.1208. Copyright (C) 2011 American Megatrends, Inc.
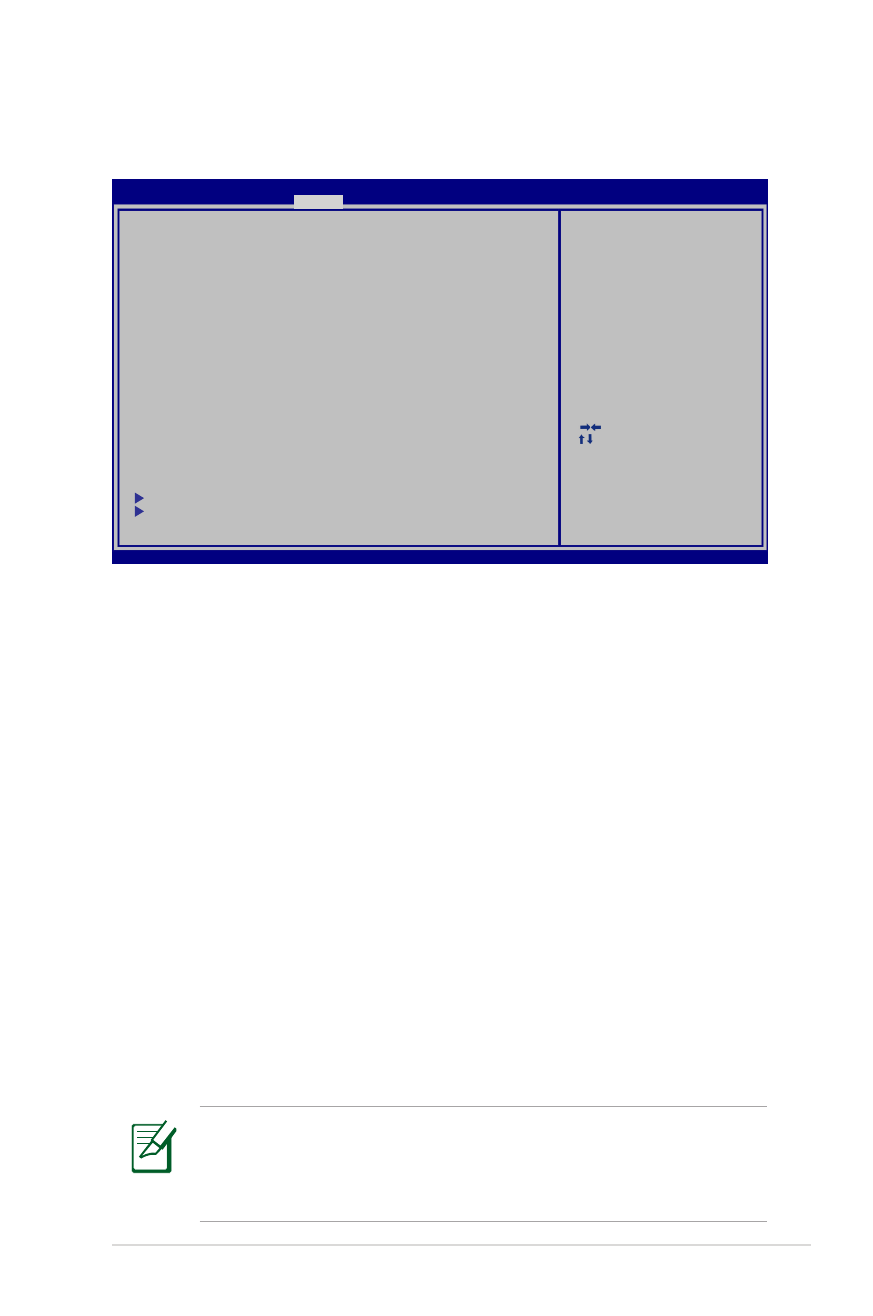
Aptio Setup Utility - Copyright (C) 2011 American Megatrends, Inc.
Main Advanced Chipset
Boot
Security Save & Exit
Boot Configuration
UEFI Boot
[Disabled]
PXE ROM
[Disabled]
Boot Option Priorities
Boot Option #1
[Windows Boot Manager]
Boot Option #2
[P0: ST9750423AS ...]
Boot Option #3
[P0: WDC WD7500BPKT...]
CD/DVD ROM Drive BBS Priorities
Hard Device BBS Priorities
Add New Boot Option
Delete Boot Option
E n a b l e s / D i s a b l e s Q u i e t B o o t
option.
Boot Option #1
P2: MATSHITABD-MLT UJ240AFW
Windows Boot Manager
P0: ST9750423AS
Disabled
Manual de utilizare pentru notebook PC
A-5
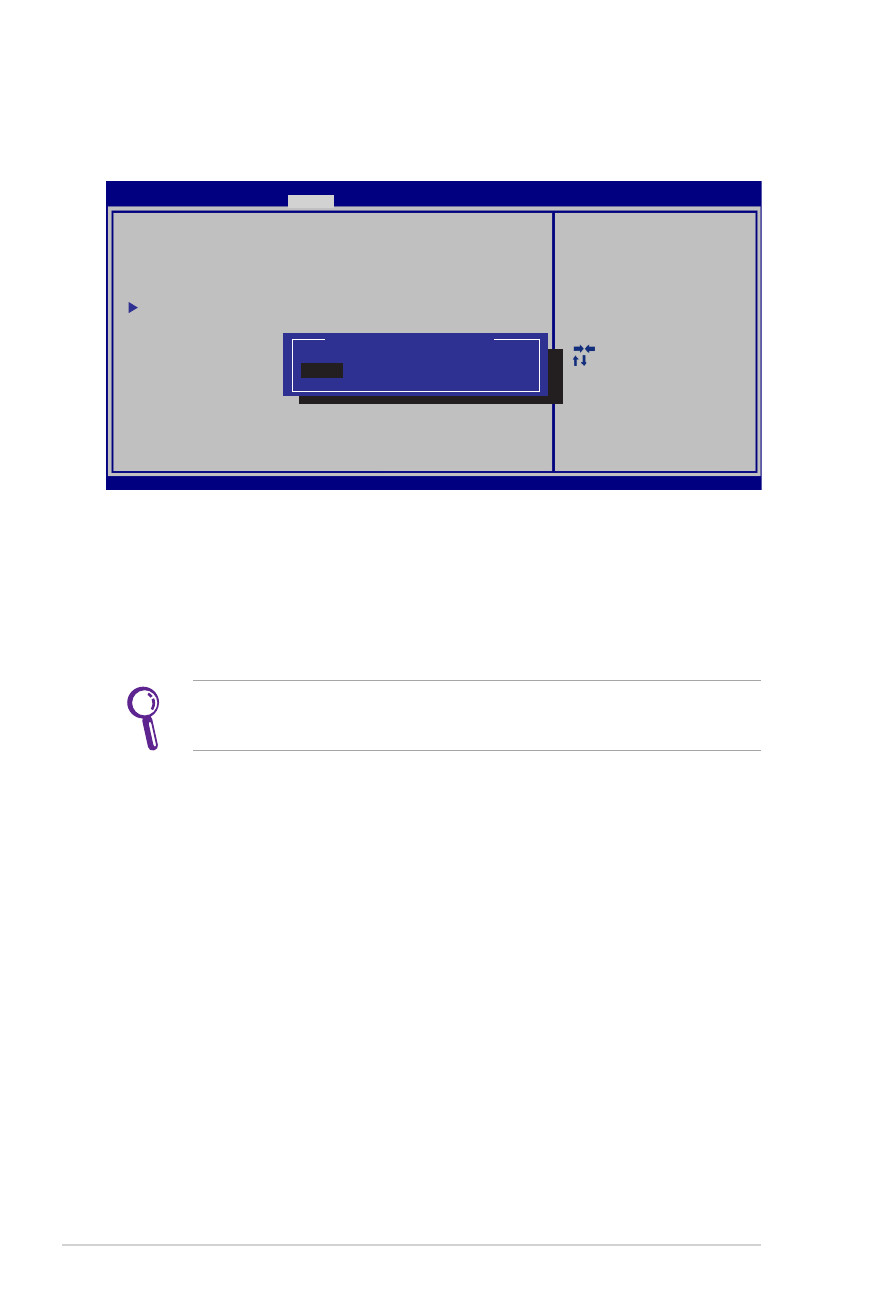
Setarea de securitate
Pentru a seta parola:
1. În ecranul Security (Securitate), selectaţi Setup Administrator
Password (Configurare parolă administrator) sau User
Password (Parolă administrator).
2. Introduceţi o parolă şi apăsaţi [Enter].
3. Introduceţi din nou parola şi apăsaţi [Enter].
4. În acest moment, parola este stabilită.
Pentru a şterge parola:
1. În ecranul Security (Securitate), selectaţi Setup Administrator
Password (Configurare parolă administrator) sau User
Password (Parolă administrator).
2. Introduceţi parola curentă şi apăsaţi pe [Enter] (Enter).
3. Nu completaţi nimic în câmpul Create New Password (Creare
parolă nouă) şi apăsaţi pe [Enter] (Enter).
4. Nu completaţi nimic în câmpul Confirm New Password
(Confirmare parolă nouă) şi apăsaţi pe [Enter] (Enter)
5. Apoi parola este ştearsă.
Vi se va solicita completarea câmpurilor Utilizator Parolă de
fiecare dată când veţi porni Notebook PC (fie că intră în BIOS,
fie în SO). Parolă administrator vi se solicită doar dacă doriţi să
intraţi pentru a configura setările BIOS.
: Select Screen
:
Select Item
Enter: Select
+/—: Change Opt.
F1: General Help
F9: Optimized Defaults
F10: Save ESC: Exit
Version 2.01.1208. Copyright (C) 2011 American Megatrends, Inc.
Aptio Setup Utility - Copyright (C) 2011 American Megatrends, Inc.
Main Advanced Boot
Security
Save & Exit
If ONLY the Administrator’s password is set,
then this only limits access to Setup and is
only asked for when entering Setup.
If ONLY the user’s password is set, then this
is a power on password and must be entered to
boot or enter Setup. In Setup, the User will
have Administrator rights.
The password length must be
in the following range:
Minimum length
3
Maximum length
20
Administrator Password
User Password
Secure Boot control
[Enabled]
HDD Password Status :
NOT INSTALLED
Set Master Password
Set User Password
I/O Interface Security
Security Boot Policy
Set User Password
A-6
Manual de utilizare pentru notebook PC
Securitate interfaţă I/O (intrare/ieşire)
Pentru a bloca interfaţa I/O:
1. Din ecranul Securitate selectaţi Securitate interfaţă I/O.
2. Selectaţi interfaţa pe care doriţi să o blocaţi şi faceţi clic pe
blocare.
Setările Securitate interfaţă I/O pot fi modificate doar dacă vă
logaţi cu privilegii de administrator.
: Select Screen
:
Select Item
Enter: Select
+/—: Change Opt.
F1: General Help
F9: Optimized Defaults
F10: Save ESC: Exit
Version 2.01.1208. Copyright (C) 2011 American Megatrends, Inc.
Aptio Setup Utility - Copyright (C) 2011 American Megatrends, Inc.
Security
I/O Interface Security
LAN Network Interface
[UnLock]
Wireless Network Interface
[UnLock]
HD AUDIO Interface
[UnLock]
SATA ODD Interface
[UnLock]
USB Interface Security
I f L o c k e d , 2 n d S A T A H D D w i l l
be disabled.
LAN Network Interface
Lock
UnLock
Manual de utilizare pentru notebook PC
A-7
Securitate interfaţă USb
Pentru a bloca interfaţa USB:
1. Din ecranul Securitate selectaţi Securitate interfaţă I/O >
Securitate interfaţă USb.
2. Selectaţi interfaţa pe care doriţi să o blocaţi şi faceţi clic pe
blocare.
Setările Securitate interfaţă USb pot fi modificate doar dacă vă
logaţi cu privilegii de administrator.
Dacă setaţi Interfaţă USb pe [Blocare] , Porturile externe şi
Cameră CMOS vor fi simultan blocate şi ascunse.
: Select Screen
:
Select Item
Enter: Select
+/—: Change Opt.
F1: General Help
F9: Optimized Defaults
F10: Save ESC: Exit
Version 2.01.1208. Copyright (C) 2011 American Megatrends, Inc.
Aptio Setup Utility - Copyright (C) 2011 American Megatrends, Inc.
Security
USB Interface Security
USB Interface
[UnLock]
External Ports
[UnLock]
BlueTooth
[UnLock]
CMOS Camera
[UnLock]
Card Reader
[UnLock]
I f L o c k e d , a l l U S B d e v i c e w i l l
be disabled.
USB Interface
LocK
UnLock
A-8
Manual de utilizare pentru notebook PC
Parolă HDD
Pentru a seta parola HDD:
1. Din ecranul Securitate faceţi clic pe Setare parolă
coordonator, tastaţi o parolă şi apăsaţi pe [Enter] (Enter).
2. Retastaţi pentru confirmarea parolei şi apăsaţi pe [Enter] (Enter).
3. Faceţi clic pe Setare parolă utilizator şi repetaţi paşii
precedenţi pentru a seta parola utilizatorului.
4. În acest moment parola este setată.
• Parola HDD poate fi modificată doar dacă vă logaţi cu
privilegii de administrator.
• Este necesar ca mai întâi se setaţi Parolă coordinator şi apoi
Parolă utilizator.
Vi se va solicita întâi să introduceţi parola de utilizator (dacă
există), apoi parola de utilizator HDD când porniţi Notebook PC
şi nu veţi putea accesa sistemul de operare dacă nu aţi introdus
parola corectă.
: Select Screen
:
Select Item
Enter: Select
+/—: Change Opt.
F1: General Help
F9: Optimized Defaults
F10: Save ESC: Exit
Version 2.01.1204. Copyright (C) 2011 American Megatrends, Inc.
Aptio Setup Utility - Copyright (C) 2011 American Megatrends, Inc.
Main Advanced Boot
Security
Save & Exit
If ONLY the Administrator’s password is set,
then this only limits access to Setup and is
only asked for when entering Setup.
If ONLY the user’s password is set, then this
is a power on password and must be entered to
boot or enter Setup. In Setup, the User will
have Administrator rights.
The password length must be
in the following range:
Minimum length
3
Maximum length
20
Administrator Password
User Password
Secure Boot control
[Enabled]
HDD Password Status :
NOT INSTALLED
Set Master Password
Set User Password
I/O Interface Security
Security Boot Policy
Set the system boot order.
***Advanced to Power Cycle
System after Setting Hard Disk
Passwords***
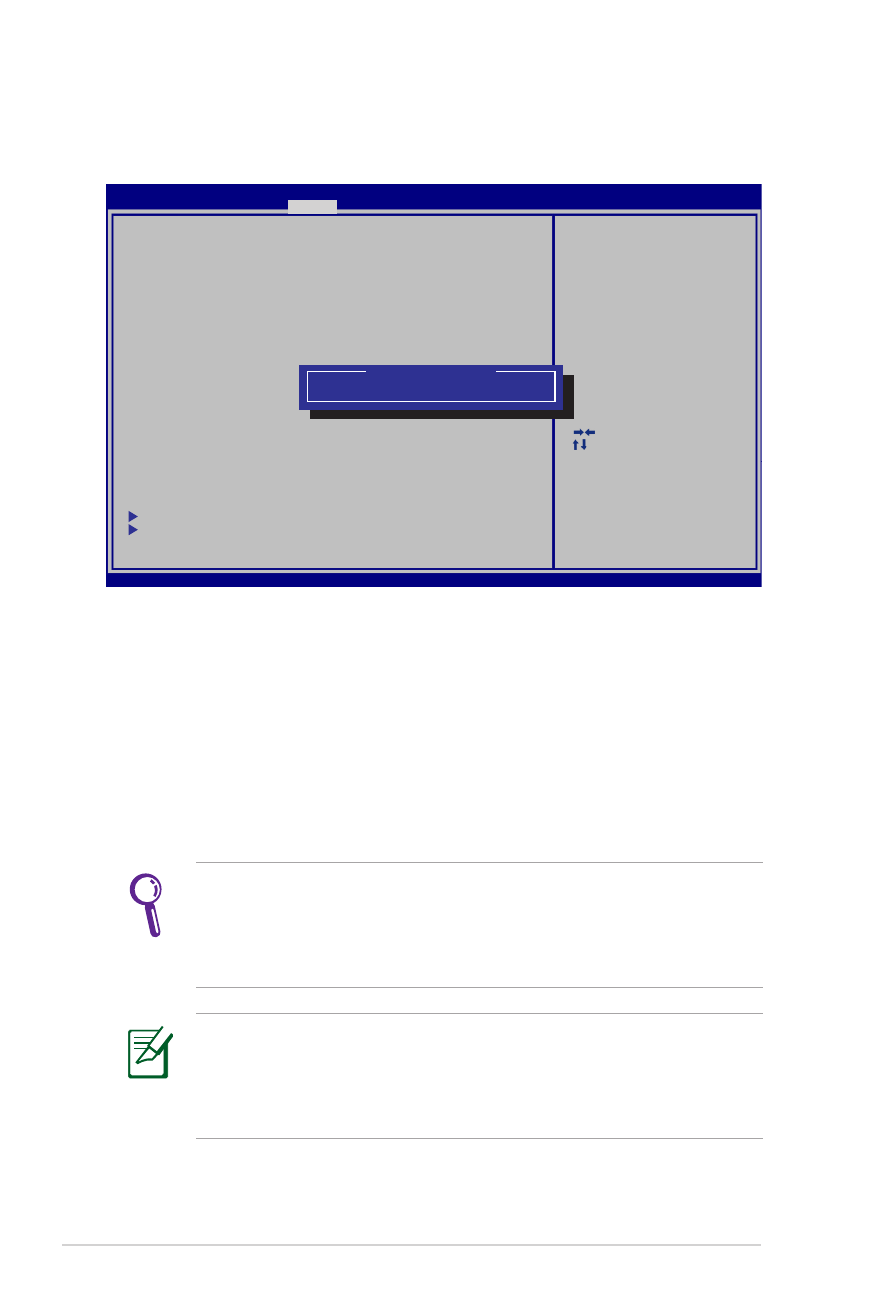
Create New Password

Manual de utilizare pentru notebook PC
A-9
Salvarea modificărilor
Dacă doriţi să păstraţi setările configuraţiei, trebuie să salvaţi
modificările înainte de a ieşi din utilitarul pentru setare BIOS.
: Select Screen
:
Select Item
Enter: Select
+/—: Change Opt.
F1: General Help
F9: Optimized Defaults
F10: Save ESC: Exit
Version 2.01.1208. Copyright (C) 2011 American Megatrends, Inc.
Aptio Setup Utility - Copyright (C) 2011 American Megatrends, Inc.
Main Advanced Chipset Boot
Security
Save & Exit
Save Changes and Exit
Discard Changes and Exit
Save Options
Save Changes
Discard Changes
Restore Defaults
Boot Override
P2: MATSHITABD-MLT UJ240AFW
Windows Boot Manager
P0: WDC WD7500BPKT-80PK4T0
Launch EFI Shell from filesystem device
Exit system setup after saving
the changes.

A-10
Manual de utilizare pentru notebook PC