Pengaturan BIOS Sistem
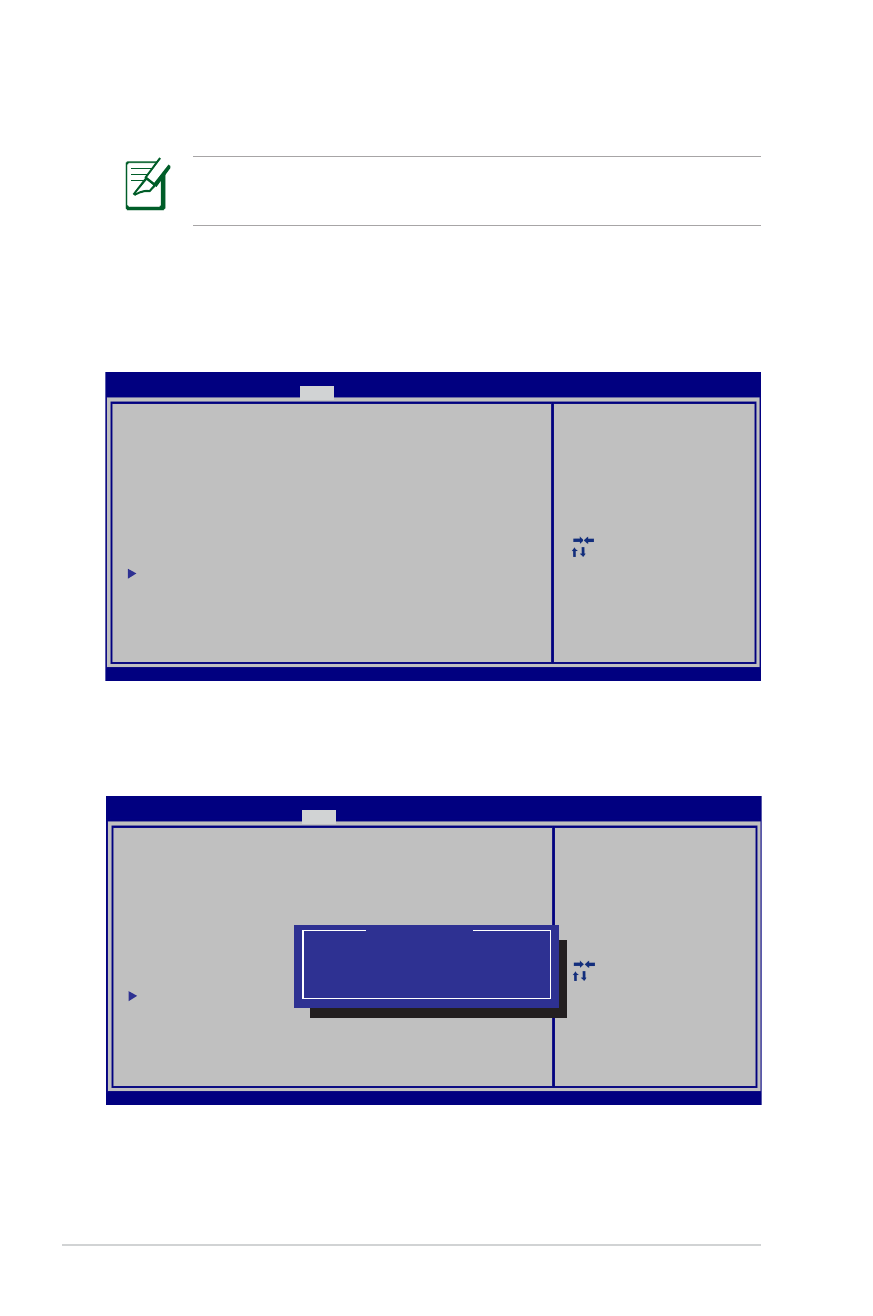
Perangkat Boot
1. Pada layar Boot, pilih Boot Option #1 (Pilihan Boot #1).
2. Tekan [Enter], lalu pilih perangkat sebagai Boot Option #1
(Pilihan Boot #1).
Layar BIOS pada bab ini hanya ditujukan sebagai referensi. Layar
sebenarnya dapat berbeda menurut model dan kawasan.
: Select Screen
:
Select Item
Enter: Select
+/—: Change Opt.
F1: General Help
F9: Optimized Defaults
F10: Save ESC: Exit
Version 2.01.1208. Copyright (C) 2011 American Megatrends, Inc.
Aptio Setup Utility - Copyright (C) 2011 American Megatrends, Inc.
Main Advanced Chipset
Boot
Security Save & Exit
Boot Configuration
UEFI Boot
[Enabled]
Launch PXE OpROM
[Disabled]
Boot Option Priorities
Boot Option #1
[P0: WDC WD7500BPKT...]
Boot Option #2
[P2: MATSHITABD-MLT...]
Boot Option #3
[Windows Boot Manager]
CD/DVD ROM Drive BBS Priorities
Hard Device BBS Priorities
Add New Boot Option
Delete Boot Option
Enables/Disables UEFI boot from
disks.
: Select Screen
:
Select Item
Enter: Select
+/—: Change Opt.
F1: General Help
F9: Optimized Defaults
F10: Save ESC: Exit
Version 2.01.1208. Copyright (C) 2011 American Megatrends, Inc.
Aptio Setup Utility - Copyright (C) 2011 American Megatrends, Inc.
Main Advanced Chipset
Boot
Security Save & Exit
Boot Configuration
UEFI Boot
[Disabled]
PXE ROM
[Disabled]
Boot Option Priorities
Boot Option #1
[Windows Boot Manager]
Boot Option #2
[P0: ST9750423AS ...]
Boot Option #3
[P0: WDC WD7500BPKT...]
CD/DVD ROM Drive BBS Priorities
Hard Device BBS Priorities
Add New Boot Option
Delete Boot Option
E n a b l e s / D i s a b l e s Q u i e t B o o t
option.
Boot Option #1
P2: MATSHITABD-MLT UJ240AFW
Windows Boot Manager
P0: ST9750423AS
Disabled
Panduan Pengguna PC Notebook
L-5
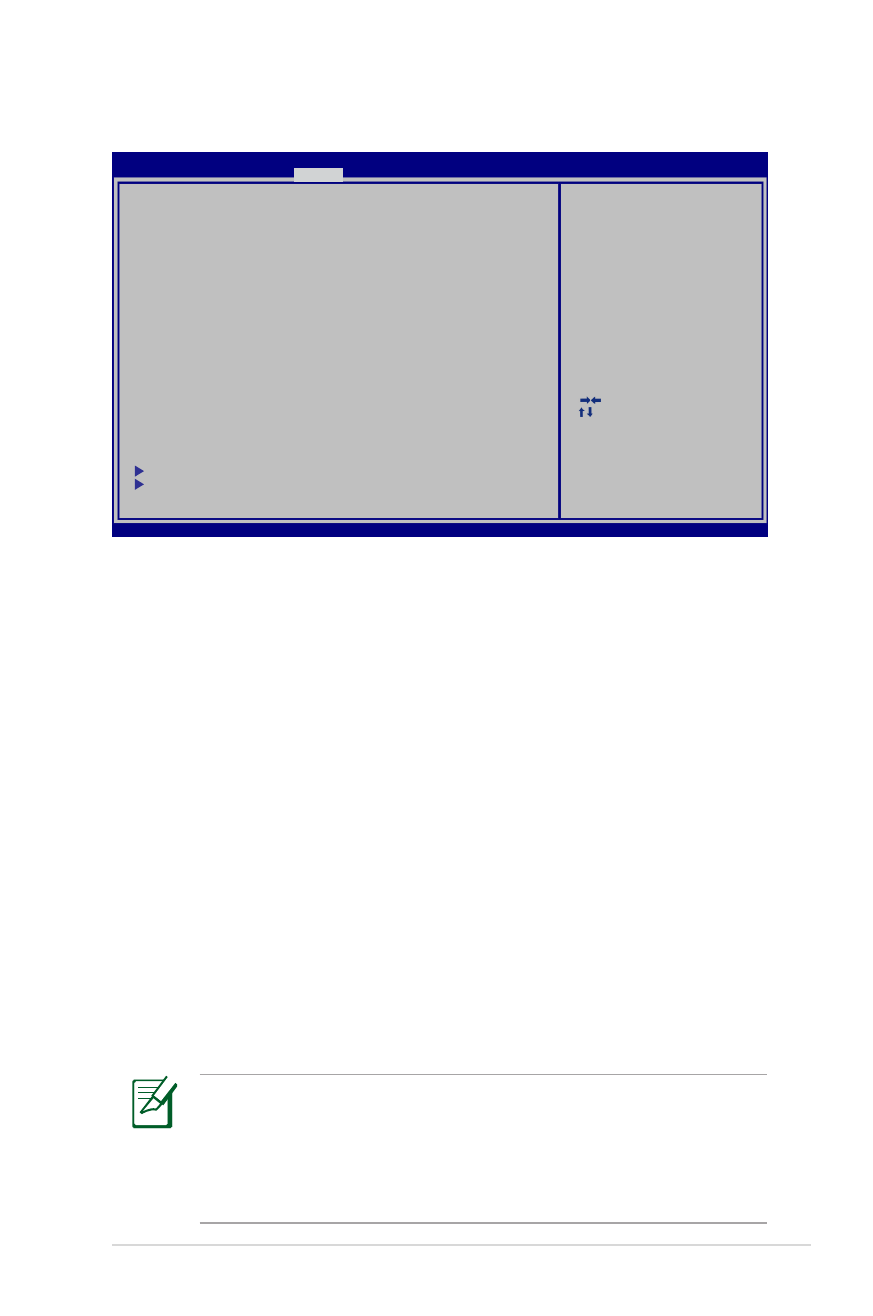
Pengaturan Keamanan
Untuk menetapkan sandi:
1. Pada layar
Security (Keamanan), pilih Setup Administrator
Password (Buat Sandi Administrator) atau User Password
(Sandi Pengguna).
2. Masukkan sandi, lalu tekan [Enter].
3. Masukkan kembali untuk mengkonfirmasikan sandi, lalu tekan
[Enter].
4. Sandi pun ditetapkan.
Untuk menghapus sandi:
1. Pada layar
Security (Keamanan), pilih Setup Administrator
Password (Buat Sandi Administrator) atau User Password
(Sandi Pengguna).
2. Masukkan sandi yang sedang digunakan, lalu tekan [Enter].
3. Biarkan kolom Create New Password (Buat Sandi Baru)
kosong, lalu tekan [Enter].
4. Biarkan kolom Confirm New Password (Konfirmasikan Sandi
Baru) kosong, lalu tekan [Enter].
5. Sandi pun terhapus.
Anda akan diminta memasukkan User Password (Sandi
Pengguna) saat menghidupkan PC Notebook (mengakses BIOS
atau OS). Administrator Password (Sandi Administrator)
hanya diminta bila Anda ingin mengakses dan mengkonfigurasi
pengaturan BIOS.
: Select Screen
:
Select Item
Enter: Select
+/—: Change Opt.
F1: General Help
F9: Optimized Defaults
F10: Save ESC: Exit
Version 2.01.1208. Copyright (C) 2011 American Megatrends, Inc.
Aptio Setup Utility - Copyright (C) 2011 American Megatrends, Inc.
Main Advanced Boot
Security
Save & Exit
If ONLY the Administrator’s password is set,
then this only limits access to Setup and is
only asked for when entering Setup.
If ONLY the user’s password is set, then this
is a power on password and must be entered to
boot or enter Setup. In Setup, the User will
have Administrator rights.
The password length must be
in the following range:
Minimum length
3
Maximum length
20
Administrator Password
User Password
Secure Boot control
[Enabled]
HDD Password Status :
NOT INSTALLED
Set Master Password
Set User Password
I/O Interface Security
Security Boot Policy
Set User Password

L-6
Panduan Pengguna PC Notebook
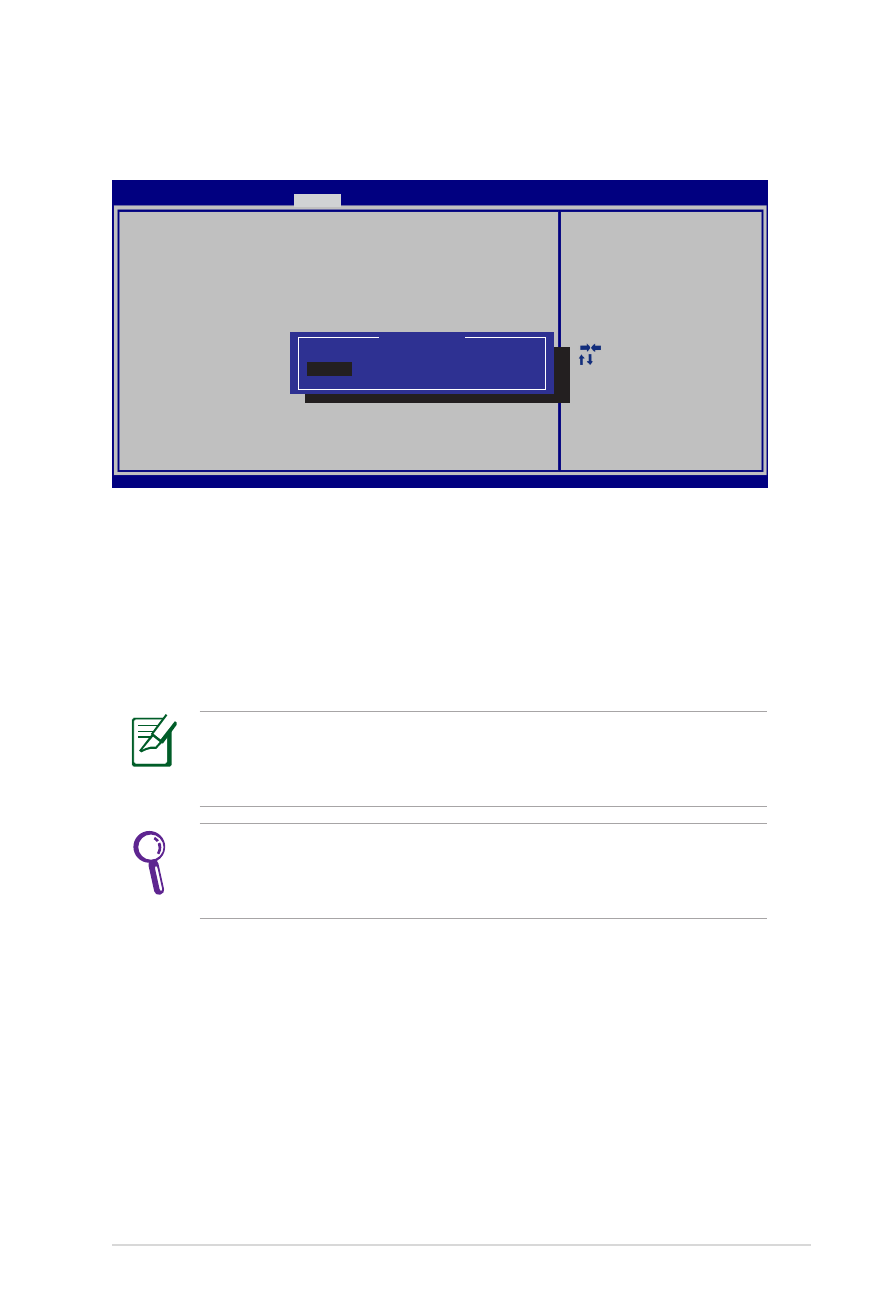
Keamanan Interface I/O
Pengaturan I/O Interface Security (Keamanan Interface
I/O) hanya dapat diubah bila Anda log in dengan hak istimewa
Administrator.
Untuk mengunci interface I/O:
1. Pada layar
Security (Keamanan), pilih I/O Interface Security
(Keamanan Interface I/O).
2. Pilih interface yang akan dikunci, lalu klik
Lock (Kunci).
: Select Screen
:
Select Item
Enter: Select
+/—: Change Opt.
F1: General Help
F9: Optimized Defaults
F10: Save ESC: Exit
Version 2.01.1208. Copyright (C) 2011 American Megatrends, Inc.
Aptio Setup Utility - Copyright (C) 2011 American Megatrends, Inc.
Security
I/O Interface Security
LAN Network Interface
[UnLock]
Wireless Network Interface
[UnLock]
HD AUDIO Interface
[UnLock]
SATA ODD Interface
[UnLock]
USB Interface Security
I f L o c k e d , 2 n d S A T A H D D w i l l
be disabled.
LAN Network Interface
Lock
UnLock
Panduan Pengguna PC Notebook
L-7
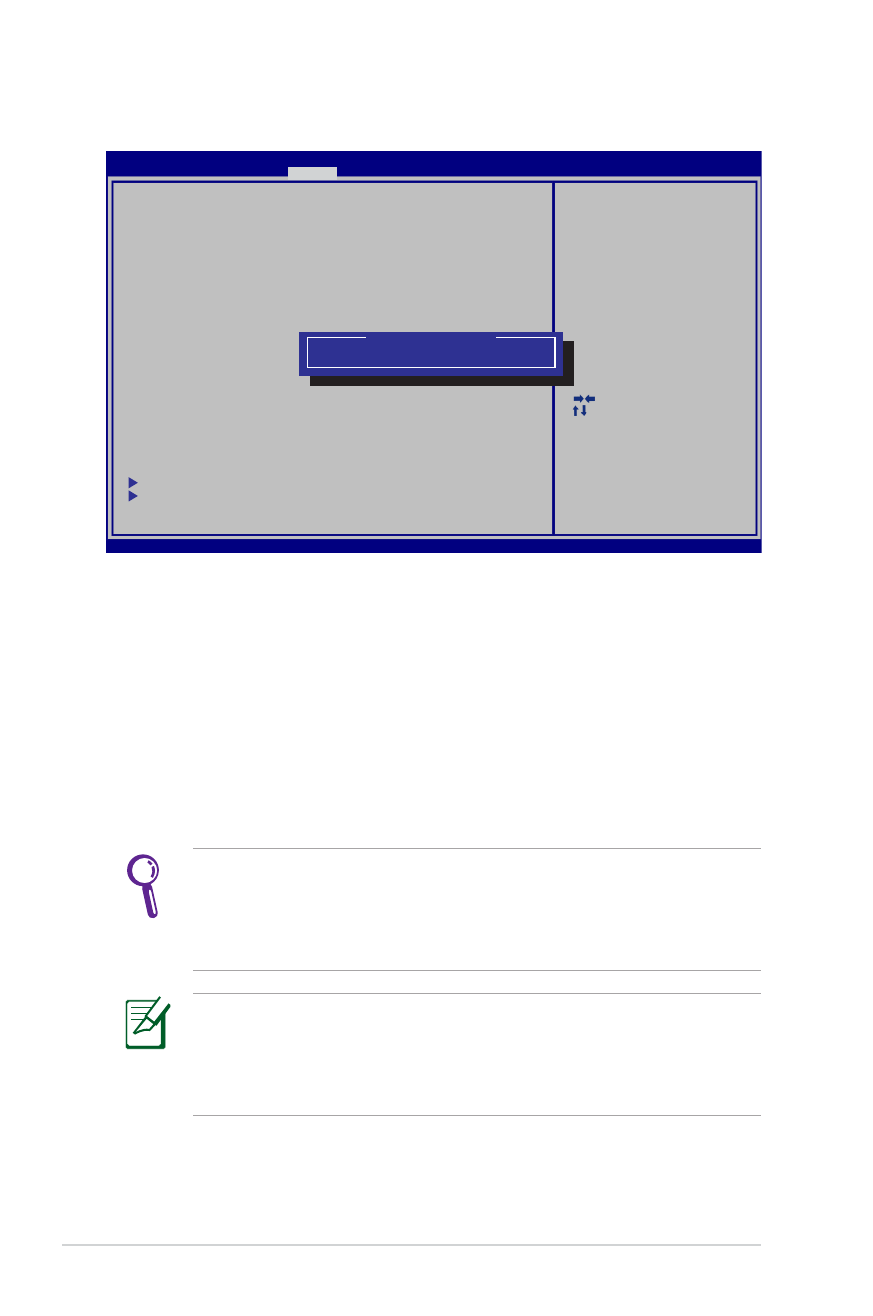
Keamanan Interface USB
Pengaturan USB Interface Security (Keamanan Interface
USB) hanya dapat diubah bila Anda log in dengan hak istimewa
Administrator.
Jika Anda mengatur USB Interface (Antarmuka USB) ke [Kunci],
External Ports (Port Eksternal) dan CMOS Camera (Kamera
CMOS) akan dikunci dan disembunyikan sekaligus.
Untuk mengunci interface USB:
1. Pada layar
Security (Keamanan), pilih /O Interface Security
(Keamanan Interface I/O) > USB Interface Security (Keamanan
Interface USB).
2. Pilih interface yang akan dikunci, lalu klik
Lock (Kunci).
: Select Screen
:
Select Item
Enter: Select
+/—: Change Opt.
F1: General Help
F9: Optimized Defaults
F10: Save ESC: Exit
Version 2.01.1208. Copyright (C) 2011 American Megatrends, Inc.
Aptio Setup Utility - Copyright (C) 2011 American Megatrends, Inc.
Security
USB Interface Security
USB Interface
[UnLock]
External Ports
[UnLock]
BlueTooth
[UnLock]
CMOS Camera
[UnLock]
Card Reader
[UnLock]
I f L o c k e d , a l l U S B d e v i c e w i l l
be disabled.
USB Interface
LocK
UnLock
L-8
Panduan Pengguna PC Notebook
Sandi HDD
• Sandi HDD hanya dapat diubah bila Anda log in dengan hak
istimewa Administrator.
• Anda harus membuat Master Password (Sandi Master)
sebelum membuat User Password (Sandi Pengguna).
Anda akan diminta memasukkan sandi pengguna terlebih dulu
(jika ada), lalu sandi pengguna HDD saat menghidupkan PC
Notebook. Sistem operasi tidak dapat diakses jika Anda gagal
memasukkan sandi yang benar.
Untuk membuat sandi HDD:
1. Pada layar
Security (Keamanan), klik Set Master Password
(Buat Sandi Master), masukkan sandi, lalu tekan [Enter].
2. Masukkan kembali sandi untuk mengkonfirmasi, lalu tekan
[Enter].
3. Klik
Set User Password (Buat Sandi Pengguna), lalu ulangi
langkah sebelumnya untuk membuat sandi pengguna.
4. Sandi berhasil dibuat.
: Select Screen
:
Select Item
Enter: Select
+/—: Change Opt.
F1: General Help
F9: Optimized Defaults
F10: Save ESC: Exit
Version 2.01.1204. Copyright (C) 2011 American Megatrends, Inc.
Aptio Setup Utility - Copyright (C) 2011 American Megatrends, Inc.
Main Advanced Boot
Security
Save & Exit
If ONLY the Administrator’s password is set,
then this only limits access to Setup and is
only asked for when entering Setup.
If ONLY the user’s password is set, then this
is a power on password and must be entered to
boot or enter Setup. In Setup, the User will
have Administrator rights.
The password length must be
in the following range:
Minimum length
3
Maximum length
20
Administrator Password
User Password
Secure Boot control
[Enabled]
HDD Password Status :
NOT INSTALLED
Set Master Password
Set User Password
I/O Interface Security
Security Boot Policy
Set the system boot order.
***Advanced to Power Cycle
System after Setting Hard Disk
Passwords***
Create New Password

Panduan Pengguna PC Notebook
L-9
Save Changes
Jika ingin menyimpan pengaturan konfigurasi, Anda harus
menyimpan perubahan sebelum keluar dari utilitas konfigurasi BIOS.
: Select Screen
:
Select Item
Enter: Select
+/—: Change Opt.
F1: General Help
F9: Optimized Defaults
F10: Save ESC: Exit
Version 2.01.1208. Copyright (C) 2011 American Megatrends, Inc.
Aptio Setup Utility - Copyright (C) 2011 American Megatrends, Inc.
Main Advanced Chipset Boot
Security
Save & Exit
Save Changes and Exit
Discard Changes and Exit
Save Options
Save Changes
Discard Changes
Restore Defaults
Boot Override
P2: MATSHITABD-MLT UJ240AFW
Windows Boot Manager
P0: WDC WD7500BPKT-80PK4T0
Launch EFI Shell from filesystem device
Exit system setup after saving
the changes.

L-10
Panduan Pengguna PC Notebook